Developer Guide
- Acknowledgements
- Setting up, getting started
- Design
-
Implementation
- Adding a task into the taskl ist
- Deleting a task from the task list
- Edit Task Feature
- Display of person and task list
- Task and Person display each other
- Finding a task by keywords
- Filtering of task by its category, deadline or both
- Redisplay full task list after finding or filtering
- Sort Tasks Feature
- Email Address in task as reference (foreign key) to person in saved data
- Persistent storage for task
- Persistent storage for people
- [Proposed] Undo/redo feature
- Documentation, logging, testing, configuration, dev-ops
- Appendix: Requirements
- Appendix: Instructions for manual testing
Acknowledgements
- This project is based on AddressBook Level-3. Several ideas, implementations and diagrams are re-used or extended based on those in AddressBook Level-3.
Setting up, getting started
Refer to the guide Setting up and getting started.
Design
.puml files used to create diagrams in this document can be found in the diagrams folder. Refer to the PlantUML Tutorial at se-edu/guides to learn how to create and edit diagrams.
Architecture

The Architecture Diagram given above explains the high-level design of HackAssist.
Given below is a quick overview of main components and how they interact with each other.
Main components of the architecture
Main has two classes called Main and MainApp. It is responsible for:
- At app launch: Initializes the components in the correct sequence, and connects them up with each other.
- At shut down: Shuts down the components and invokes cleanup methods where necessary.
Commons represents a collection of classes used by multiple other components.
The rest of HackAssist consists of four components.
-
UI: The UI of HackAssist. -
Logic: The command executor. -
Model: Holds the data of HackAssist in memory. -
Storage: Reads data from, and writes data to, the hard disk.
How the architecture components interact with each other
The Sequence Diagram below shows how the components interact with each other for the scenario where the user issues the command delete 1.

Each of the four main components (also shown in the diagram above),
- defines its API in an
interfacewith the same name as the Component. - implements its functionality using a concrete
{Component Name}Managerclass (which follows the corresponding APIinterfacementioned in the previous point.
For example, the Logic component defines its API in the Logic.java interface and implements its functionality using the LogicManager.java class which follows the Logic interface. Other components interact with a given component through its interface rather than the concrete class (reason: to prevent outside component’s being coupled to the implementation of a component), as illustrated in the (partial) class diagram below.

The sections below give more details of each component.
UI component
The API of this component is specified in Ui.java
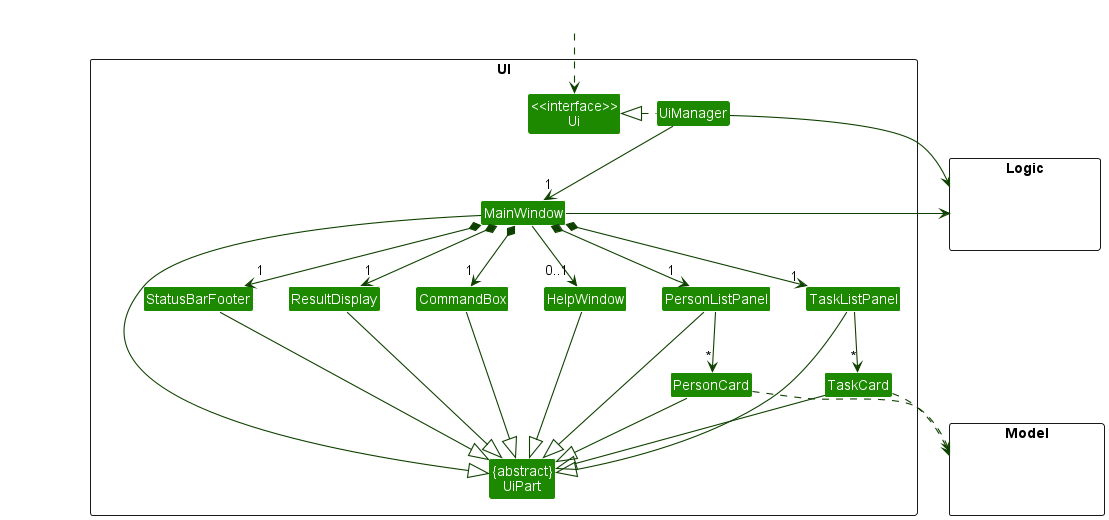
The UI consists of a MainWindow that is made up of parts e.g.CommandBox, ResultDisplay, PersonListPanel, TaskListPanel, StatusBarFooter etc. All these, including the MainWindow, inherit from the abstract UiPart class which captures the commonalities between classes that represent parts of the visible GUI.
The UI component uses the JavaFx UI framework. The layout of these UI parts are defined in matching .fxml files that are in the src/main/resources/view folder. For example, the layout of the MainWindow is specified in MainWindow.fxml
The UI component,
- executes user commands using the
Logiccomponent. - listens for changes to
Modeldata so that the UI can be updated with the modified data. - keeps a reference to the
Logiccomponent, because theUIrelies on theLogicto execute commands. - depends on some classes in the
Modelcomponent, as it displaysPersonobject residing in theModel.
Logic component
API : Logic.java
Here’s a (partial) class diagram of the Logic component:

How the Logic component works:
- When
Logicis called upon to execute a command, it uses theAddressBookParserclass to parse the user command. - This results in a
Commandobject (more precisely, an object of one of its subclasses e.g.,AddCommand) which is executed by theLogicManager. - The command can communicate with the
Modelwhen it is executed (e.g. to add a person). - The result of the command execution is encapsulated as a
CommandResultobject which is returned back fromLogic.
The Sequence Diagram below illustrates the interactions within the Logic component for the execute("delete 1") API call.

DeleteCommandParser should end at the destroy marker (X) but due to a limitation of PlantUML, the lifeline reaches the end of diagram.
Here are the other classes in Logic (omitted from the class diagram above) that are used for parsing a user command:

How the parsing works:
- When called upon to parse a user command, the
AddressBookParserclass creates anXYZCommandParser(XYZis a placeholder for the specific command name e.g.,AddCommandParser) which uses the other classes shown above to parse the user command and create aXYZCommandobject (e.g.,AddCommand) which theAddressBookParserreturns back as aCommandobject. - All
XYZCommandParserclasses (e.g.,AddCommandParser,DeleteCommandParser, …) inherit from theParserinterface so that they can be treated similarly where possible e.g, during testing.
Model component
API : Model.java

The Model component,
- stores the address book data i.e., all
Personobjects (which are contained in aUniquePersonListobject) andTaskobjects (which are contained in aTaskListobject). - stores the currently ‘selected’
Personobjects (e.g., results of a search query) as a separate filtered list which is exposed to outsiders as an unmodifiableObservableList<Person>that can be ‘observed’ e.g. the UI can be bound to this list so that the UI automatically updates when the data in the list change. - stores the currently ‘selected’
Taskobjects (e.g., results of a filter query) as a separate filtered list which is exposed to outsiders as an unmodifiableObservableList<Task>that can be ‘observed’ e.g. the UI can be bound to this list so that the UI automatically updates when the data in the list change. - stores a
UserPrefobject that represents the user’s preferences. This is exposed to the outside as aReadOnlyUserPrefobjects. - does not depend on any of the other three components (as the
Modelrepresents data entities of the domain, they should make sense on their own without depending on other components)
Person object, perhaps an alternative (arguably, a more OOP) model is given below. It has a Tag list in the AddressBook, which Person references. This allows AddressBook to only require one Tag object per unique tag, instead of each Person needing their own Tag objects.
Storage component
API : Storage.java

The Storage component,
- can save both address book data and user preference data in json format, and read them back into corresponding objects.
- inherits from both
AddressBookStorageandUserPrefStorage, which means it can be treated as either one (if only the functionality of only one is needed). - depends on some classes in the
Modelcomponent (because theStoragecomponent’s job is to save/retrieve objects that belong to theModel).
Common classes
Classes used by multiple components are in the seedu.addressbook.commons package.
Implementation
This section describes some noteworthy details on how certain features are implemented.
Adding a task into the taskl ist
Motivation
Allows insertion of new task into the tasklist.
Implementation
The insertion mechanism allows a Task to be added into the tasklist. A task consists of attributes such as its name, description, priority level, category, deadline and email of person assigned. The command is executed using the AddTaskCommandclass which extends the Command class and the respective attributes of a task is determined from the AddTaskCommandParser class which parses the user input.
Given below is an example usage scenario and how the AddTask mechanism behaves at each step.
Step 1. The user launches the application for the first time, with a tasklist populated with default tasks.
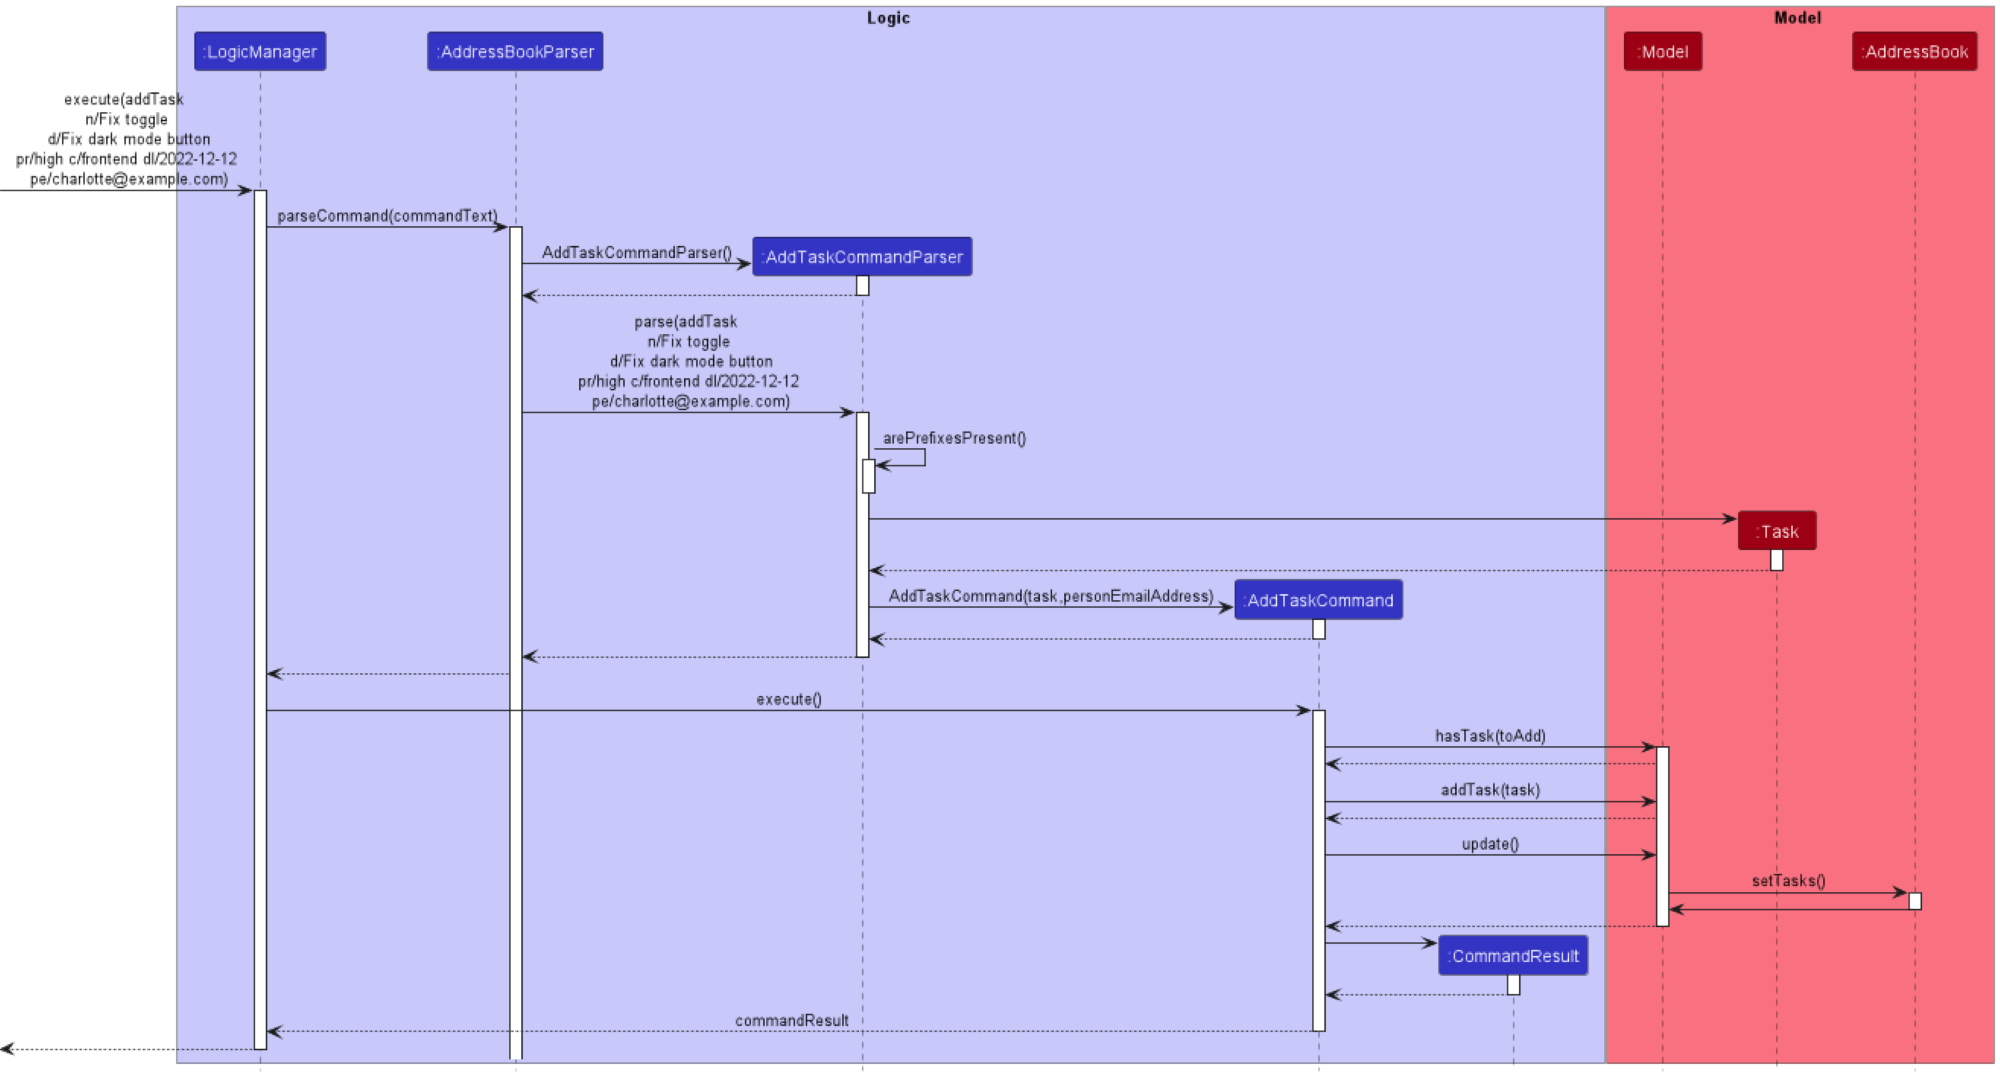
Step 2. The user executes addTask n/Fix toggle d/Fix dark mode button pr/high c/frontend dl/2022-12-12 pe/charlotte@example.com to add a task to the tasklist. The AddTaskCommand calls the Model#hasTask(), checking if the tasklist already contains the task. If the task already exist, an exception will be thrown and a task already exist error message will be returned to the user.
Step 3. If the task does not exist in the tasklist and email of person assigned is valid, the AddTaskCommand calls the Model#addTask to add the task into the tasklist.
Step 4. After making an insert into the tasklist, the AddTaskCommand calls the Model#update, which calls
AddressBook#setTasks to update the tasklist in the model to the latest version.
The following sequence diagram shows how the AddTask operation works:
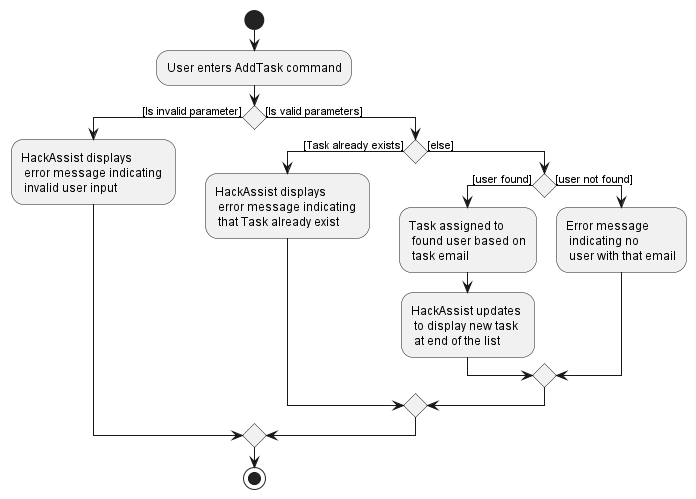
The following activity diagram summarizes what happens when a user executes a AddTask command:
Design considerations:
Aspect: How addTask executes:
-
Alternative 1 (current choice): Assigns a task based on person’s email
- Pros: Person’s email is unique. Avoid confusion of task being assigned to two different people with the same email.
- Cons: Not intuitive.
-
Alternative 2: Assigns a task based on person’s name
- Pros: Much more intuitive for a task to be assigned to a person name than person email.
- Cons: This reduces the flexibility of having two person with the same full name.
Deleting a task from the task list
Motivation
Allows removal of task from tasklist based on the index of the task.
Implementation
The deletion mechanism allows a Task to be deleted from the tasklist based on its index. The command is executed using the DeleteTaskCommandclass which extends the Command class and the index of the task to be deleted is determined from the DeleteTaskCommandParser class which parses the user input
Given below is an example usage scenario and how the DeleteTask mechanism behaves at each step.
Step 1. The user launches the application for the first time, with a tasklist populated with default tasks.
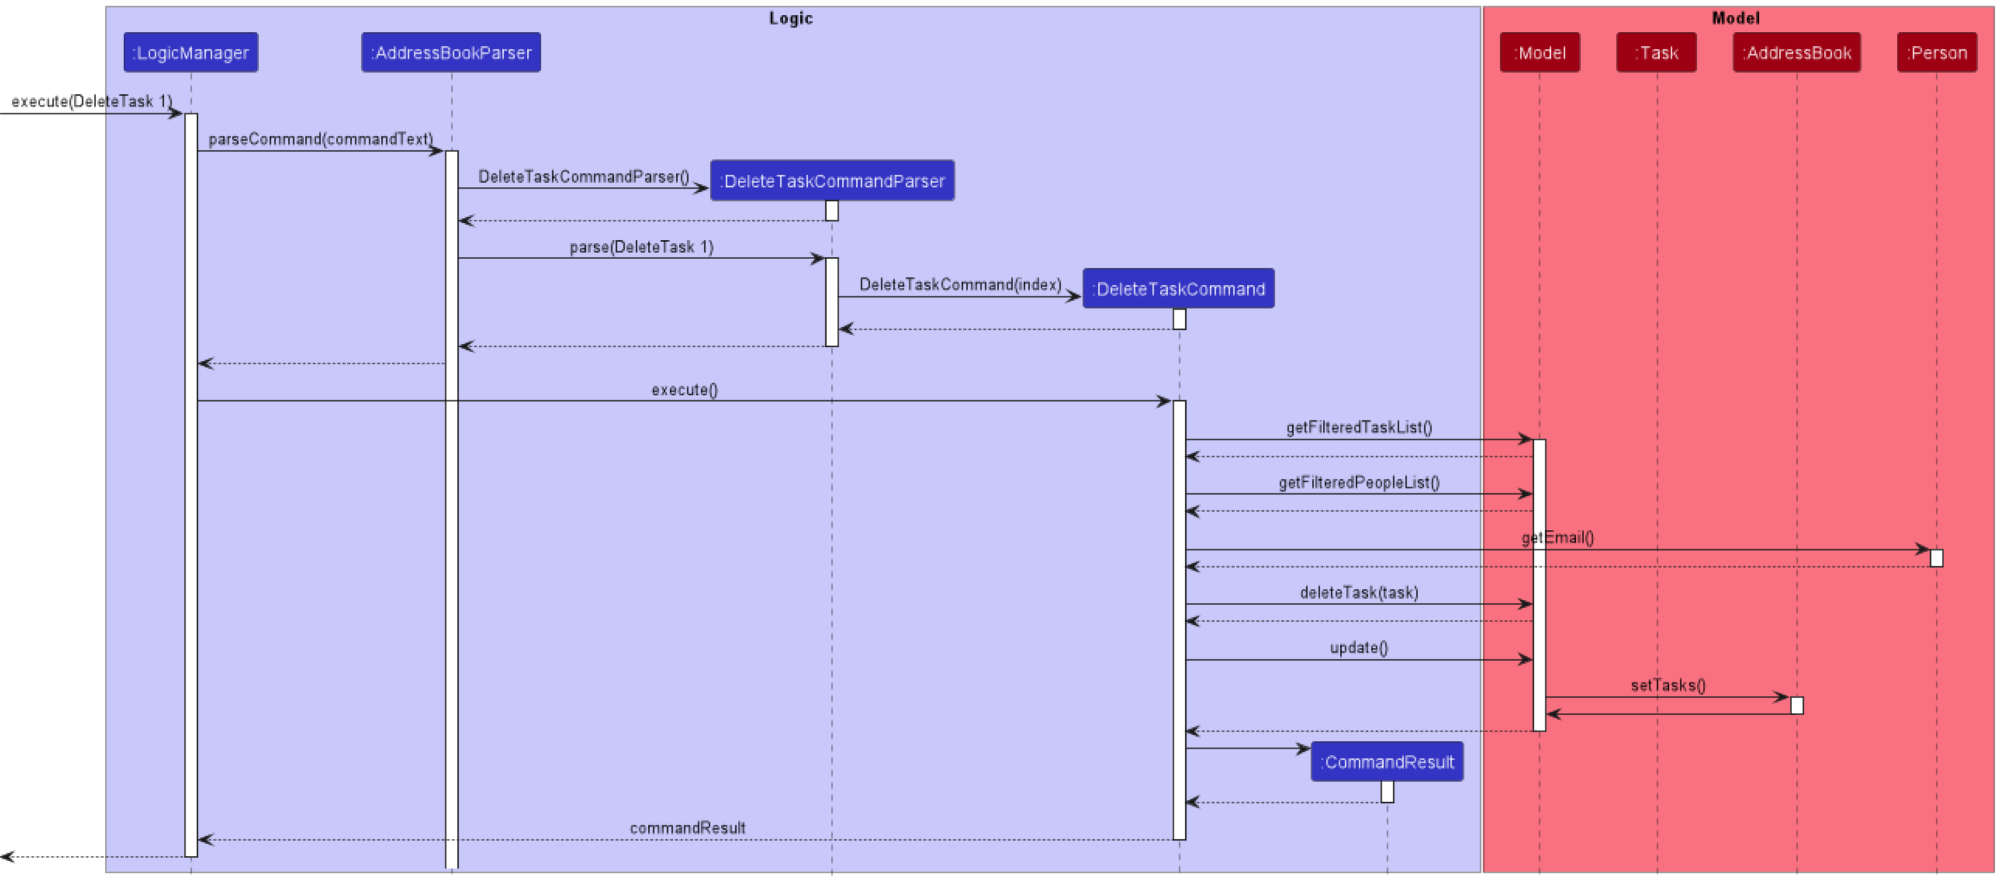
Step 2. The user wants to delete the second task on the task list. The user executes deleteTask 2 to delete the second task from the tasklist. The DeleteTaskCommand calls the Model#getFilteredTaskList(), and checks if the index of the task to be deleted is within the size of the tasklist. If it is not, an error message containing invalid index provided
is displayed to the user.
Step 3. Next, Model#getFilteredPersonList is called to obtain the personlist and we check each person to see if the email matches the email of the person the task is assigned to. If it matches, we delete the task from the list of tasks the person is assigned to.
Step 4. After updating all the relevant people assigned to the task, the DeleteTaskCommand calls the
Model#deleteTask to delete the task from the tasklist.
Step 5. After making a deletion from the tasklist, the DeleteTaskCommand calls the Model#update, which calls
AddressBook#setTasks to update the tasklist in the model to the latest version
The following sequence diagram shows how the DeleteTask operation works:
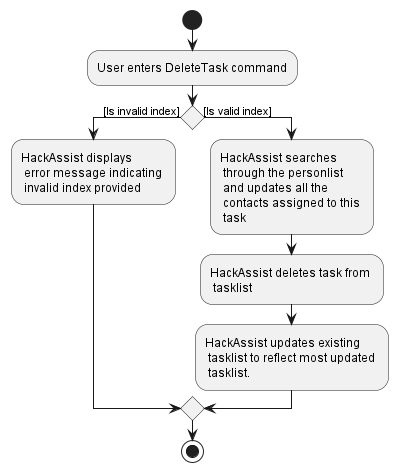
The following activity diagram summarizes what happens when a user executes a DeleteTask command:
Design considerations:
Aspect: How deleteTask executes:
-
Alternative 1 (current choice): Deletes task based on index.
- Pros: O(1) time of deletion as we retrieve from the list based on index.
- Cons: None
-
Alternative 2: Deletes task based on taskName.
itself.
- Pros: Easier to delete task in the case where we have a lot of tasks, where we do not have to scroll to find the task index.
- Cons: O(n) time to deletion as we need to search the tasklist based on taskName.
Edit Task Feature
Implementation
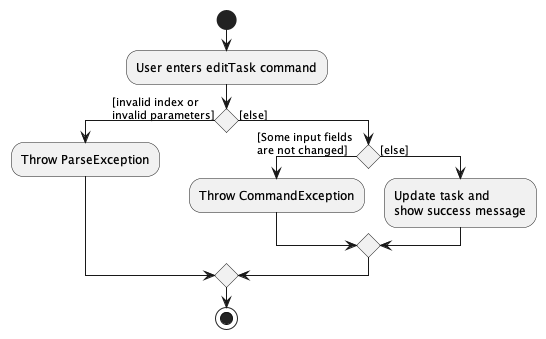
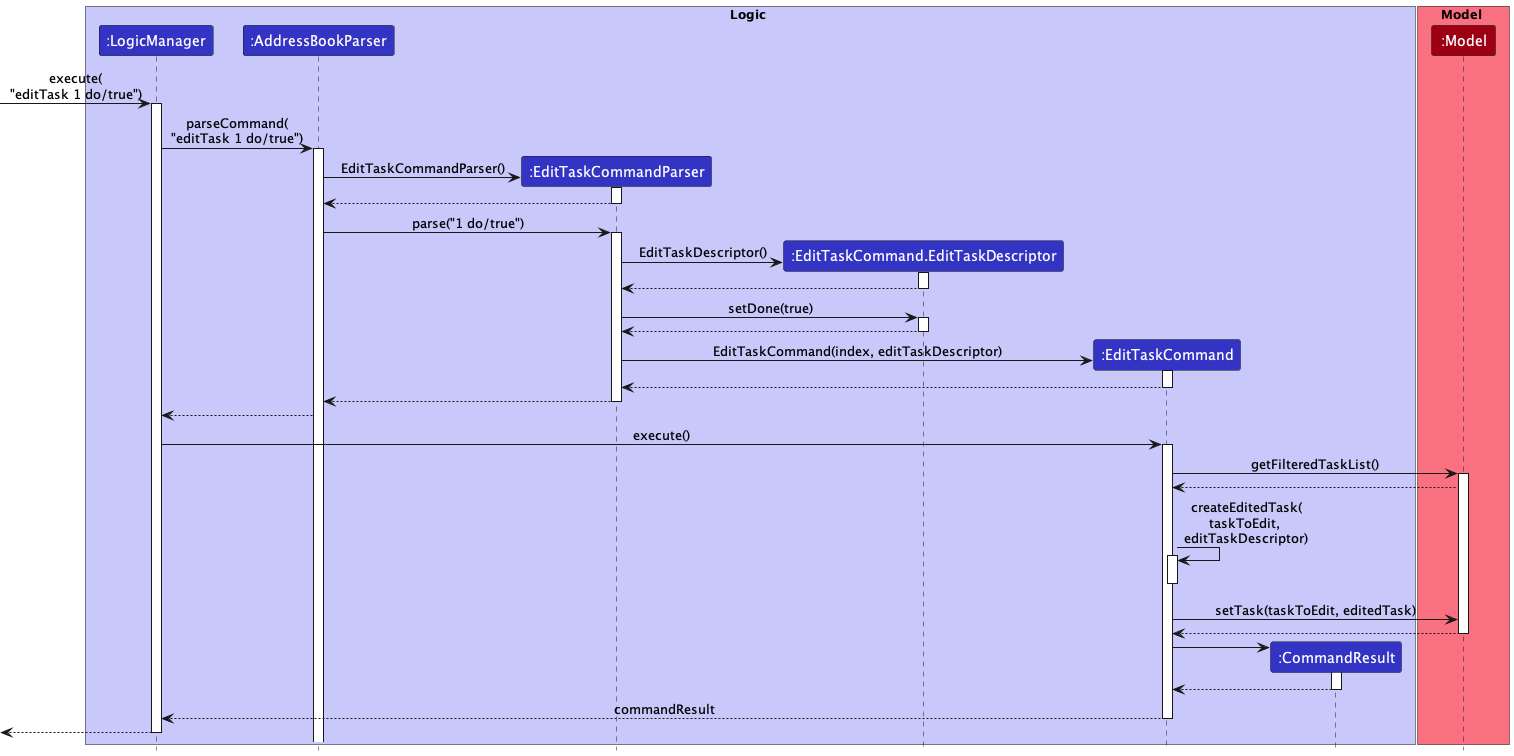
When the editTask command is entered, an EditTaskCommand.EditTaskDescriptor is created which stores the new details to edit the task with. If the inputs are invalid, an exception will be thrown and the corresponding error message will be displayed. If the inputs are valid, then the model is updated with the edited task.
The following activity diagram summarizes what happens when a user executes an editTask command:
The sequence diagram is shown below:
Display of person and task list
Motivation
Given below is a partial class diagram of the old UI.

In the original implementation, there is only one PersonListPanel that displays a list of people using PersonCard.
This was sufficent, as the original addressbook only had to manage a list of people.
However, our product needs to display tasks in addition to people, as this is a core feature of our product.
Tasks have a lot of information regarding them, such as deadline, priority, description and category. Thus, including them as
labels within the PersonCard would quickly lead to a very messy and disorganized display. Additionally, we intended for each person
to be able to be assigned to multiple tasks. Thus, this would introduce the probelm of having a dynamic number of labels for each
PersonCard, and potentially make the UI even more messy,
Therefore, it is necessary to have a separate list panel for tasks, as well as people. This would allow the information for tasks to be cleanly displayed seperate from the information releveant to people
Implementation of the new UI
As you can see from the diagrm, the MainWindow is filled with both the person and task list
Similar to the person list, the task list will contain all the tasks currently stored in the application
By having separate list panels, it will be easier to display the tasks and people seperately

Each task is given a card, similar to the PersonCard, that displays the information regarding the task.
The user can navigate between the dispays using a tab at the top of the UI display.
Alternatives considered
We went through several iterations and design alternatives when considering the design of our User Interface
-
Alternative 1 : Display the people on the Left, and the spotlighted person’s task on the right
- Pros: Able to spotlight a single person’s tasks and the details regarding those tasks
- Cons: Displaying the result of filtering or sorting through all available tasks at once would be very difficult, and confusing for the user
-
Alternative 2: Display all the people on the Left, and all tasks on the right
- Pros: Allow the sorting and filtering of tasks to be carried our much easier
- Cons: Could result in too much information being present, which could overwhelm the user.
Task and Person display each other
Proposed Implementation
Currently, A person in the addressbook has no relation to the tasks assigned to that person. This feature will allow tasks and persons to be related to each other, and allow the UI to display which tasks are assigned to a person, and which person is in charge of a task.
This will be implemented by modifying 3 already existing commands
-
Add— Whenever a person is added, any task that shares the same email as the new Person’s email wil be updated to reflect the person’s name. -
Delete— Whenever a person is deleted, their tasks will be edited to reflect that they are not assigned to any person -
Edit— Whenever a person is edited, their tasks will be edited to reflect the new changes
Given below is an example usage scenario.
Step 1. The user launches the application for the first time.
Step 2. A new person (John) is added, with an email of test@example.com
Step 3. A new task is added, assigned to John.
Step 4. John is edited to James via the Edit command. This will be reflected in the task that John/James is assigned to
Step 5. James is deleted as a Person. The task is changed to be not assigned to anyone.
Finding a task by keywords
Implementation
The find mechanism allows a Task to be identified based on its name and description attributes. The command is executed using the FindTaskCommand, and keyword(s) for the search criteria is determined from the FindTaskCommandParser class which parses the user input. A Predicate<Task>, an instance of TaskContainsKeywordsPredicate, is created and it goes through the tasklist to filter every Task based on their name and description attributes and whether it matches any of the input keyword(s). Keyword matching is case-insensitive. The filtered tasklist is then displayed on the application.
Given below is an example usage scenario and how the find mechanism behaves at each step.
Step 1. The user launches the application for the first time, with a tasklist populated with default tasks.
Step 2. The user wants to find tasks that have the keyword ‘create’ in their names and/or descriptions. The user executes findTask create. The FindTaskCommandParser parses the input keyword and creates an instance of FindTaskCommand with ‘create’ as its TaskContainsKeywordsPredicate. This Predicate<Task> is passed as an argument into Model#updateFilteredTaskList(Predicate<Task>).
Step 3. Next, Model#getFilteredTaskList() is called to update the tasklist to display the tasks ‘Create UIUX Design’ and ‘Create Presentation’.
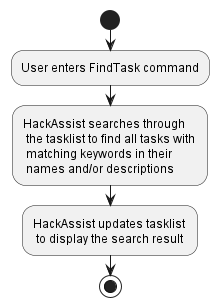
The following activity diagram summarizes what happens when a user executes a findTask command:
Filtering of task by its category, deadline or both
Implementation
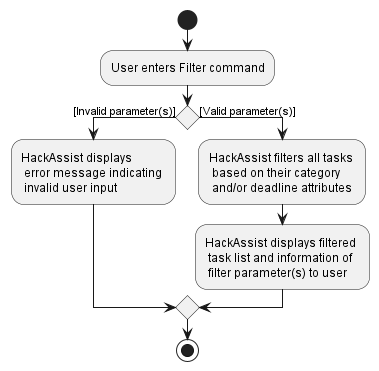
The filter mechanism allows a Task to be filtered based on its category and/or deadline attributes. The command is executed using the FilterTaskCommand, and the filter criteria is determined from the FilterTaskParser class which parses the user input. A Predicate<Task>, an instance of TaskCategoryAndDeadlinePredicate, is created and goes through the tasklist to filter every Task based on their category and/or deadline attributes, depending on if they match the input category and/or are equal to or earlier than the input date respectively. The filtered tasklist is then displayed on the application.
Given below is an example usage scenario and how the filter mechanism behaves at each step.
Step 1. The user launches the application for the first time, with a tasklist populated with default tasks.
Step 2. The user wants to see the tasks that fall under the ‘UIUX’ category and are due by 2023-01-02. The user executes filter c/uiux dl/2023-01-02. The FilterTaskParser parses the input arguments and creates an instance of FilterTaskCommand with ‘UIUX’ and ‘2023-01-02’ as the TaskCategory and TaskDate respectively for its TaskCategoryAndDeadlinePredicate. This Predicate<Task> is passed as an argument into Model#updateFilteredTaskList(Predicate<Task>).
Step 3. Next, Model#getFilteredTaskList() is called to update the tasklist to display the task ‘Create UIUX Design’.
The following activity diagram summarizes what happens when a user executes a filter command:
Redisplay full task list after finding or filtering
Implementation
Once done with the filtered tasklist, the user should be able to revert the list to redisplay the original set of tasks. The user executes listTasks, creating an instance of ListTaskCommand which passes a model.Model.PREDICATE_SHOW_ALL_TASKS as an argument into Model#updateFilteredTaskList(Predicate<Task>). Finally, Model#getFilteredTaskList() is called to update the tasklist to redisplay the original set of tasks unfiltered.
Sort Tasks Feature
Implementation
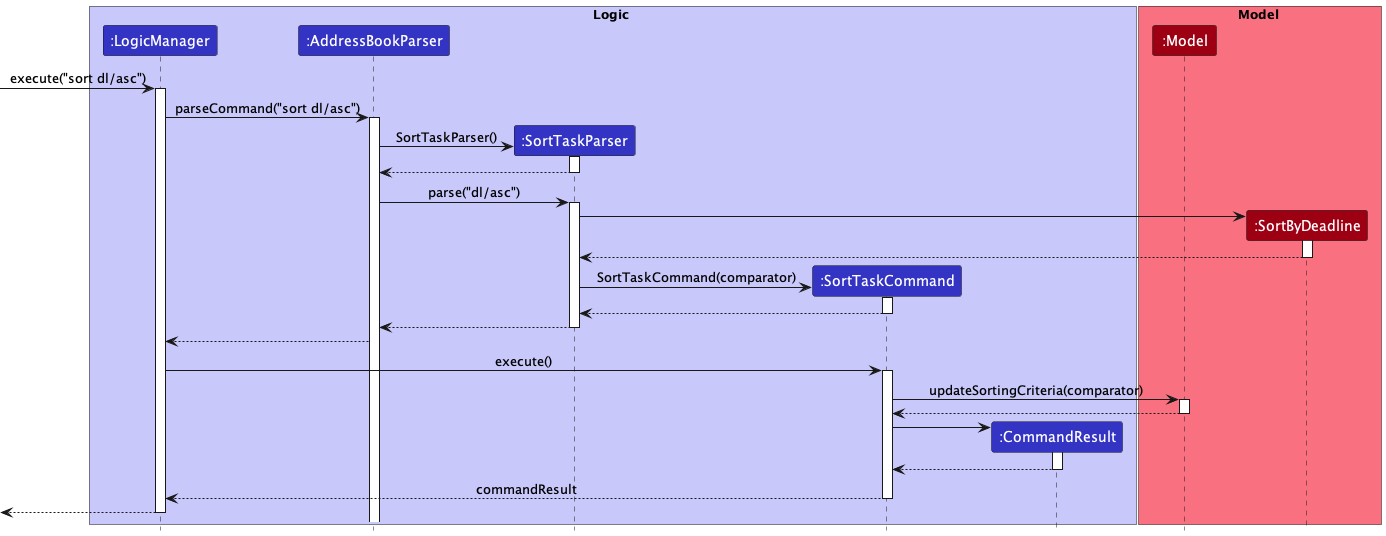
When the sort command is entered, a Comparator<Task> is created which will be an instance of either model.task.SortByDeadline or model.task.SortByPriority. This Comparator<Task> will be reversed if the task list needs to be sorted in descending order. The SortedList<Task> in the Model will then be updated to use the new Comparator<Task>.
The sequence diagram is shown below:
Email Address in task as reference (foreign key) to person in saved data
Motivation
To assign a task to a team person (represented by a Person object), we need to save an attribute of the Person object in the JsonAdaptedTask object that uniquely identifies the person.
Implementation
We use a person’s email as foreign key as it can uniquely identify a person in our person list. By implementing a foreign key this way, a change in person object is reflected in the task associated to that person. An alternative to this is to keep a person object in a task object but this will prevent the change in the person object that is supposed to be associated with the task object from being displayed in the task as they are two separate objects.
Design considerations
Aspect: How to Relate a Task and a Person in the Saved Data
-
Alternative 1 (current choice): Foreign Key Method: Save Person’s Email Address in Task Data File.
- Pros: Changes in person can be cascaded to task.
- Cons: -.
-
Alternative 2: Foreign Key Method: Save Person Phone Number in Task Data File.
- Pros: Changes in person can be cascaded to task.
- Cons: Compared to email address, phone number is more likely to be identical e.g. people may have the same phone number if they put their home phone number and they live in the same house.
-
Alternative 3: Save JSonAdaptedPerson in JSonAdaptedTask.
- Pros: -.
- Cons: Changes in
personobject are more prone to not be reflected in their associatedtask.
Persistent storage for task
Motivation
For creation of new tasks, deletion of tasks and changes of current tasks to persist over different sessions of using HackAssist (after user close HackAssist and open it again).
Implementation
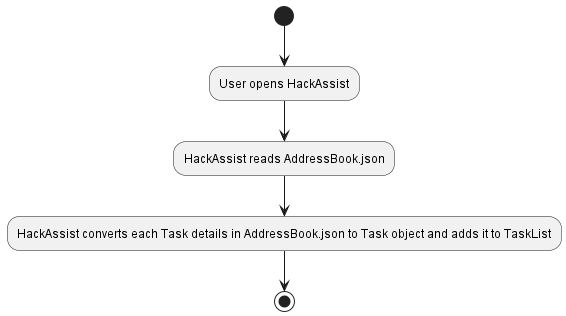
When HackAssist is opened, it will read the data file (AddressBook.json) saved in hard disk in Json format. This data file contains a list of task details (name, description, priority, category, deadline, email of the associated Person object (person assigned to this task) and status (done or not done)). Details of each task are read to create a Task object which is then added to the running HackAssist’s TaskList.
An overview of this process is shown below in the form of an activity diagram.
When reading Json file we also check whether the values saved are valid before converting it back to a Task object. This is to prevent creating a Task object with illegal values such as an empty name or name like “ “. We also check for such illegal values when creating a task through commands. However, they do not prevent creations of task with illegal values that is done by editing Json data file. Thus, the checks when creating Task from Json data file is necessary.
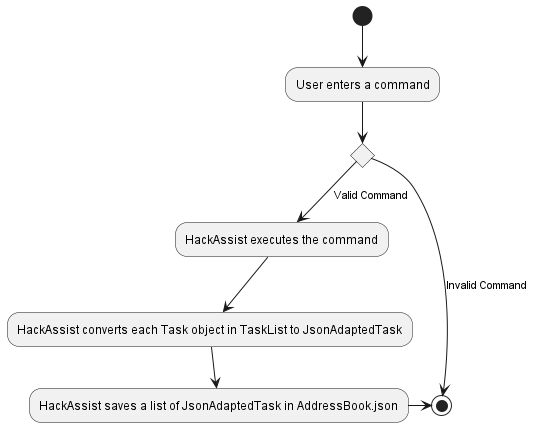
Upon execution of each Command, we convert each Task object in TaskList to JsonAdaptedTask object which is then saved in Json format in hard disk. Each JsonAdaptedTask object contains the details of the task.
An overview of this process is shown below in the form of an activity diagram.
Design considerations
Aspect: When to save data?
-
Alternative 1 (current choice): Saves the data after execution of each command.
- Pros: User does not have to remember to save (saved automatically).
- Cons: More computationally expensive as more save operations are performed.
-
Alternative 2: Creates a save command and save it when save command is executed.
- Pros: Less computationally expensive as less save operations are performed.
- Cons: User may forget to enter save command and lose all of their changes.
-
Alternative 3: Save when user enters exit command.
- Pros: Less computationally expensive as less save operations are performed.
- Cons: User may forget to enter exit command when closing the program and lose all of their changes.
Our current choice of implementation is preferred considering the main use of HackAssist. HackAssist is created mainly for Hackathons where the environment is hectic and stressful and thus, users may tend to forget to save. Moreover, although the computation cost of automatic savings are higher, the difference is not obvious during usage. Thus, we consider the cost of losing saved changes to be worse.
Persistent storage for people
The motivation, implementation and design considerations are similar to Persistent Storage for Task
[Proposed] Undo/redo feature
Proposed Implementation
The proposed undo/redo mechanism is facilitated by VersionedAddressBook. It extends AddressBook with an undo/redo history, stored internally as an addressBookStateList and currentStatePointer. Additionally, it implements the following operations:
-
VersionedAddressBook#commit()— Saves the current address book state in its history. -
VersionedAddressBook#undo()— Restores the previous address book state from its history. -
VersionedAddressBook#redo()— Restores a previously undone address book state from its history.
These operations are exposed in the Model interface as Model#commitAddressBook(), Model#undoAddressBook() and Model#redoAddressBook() respectively.
Given below is an example usage scenario and how the undo/redo mechanism behaves at each step.
Step 1. The user launches the application for the first time. The VersionedAddressBook will be initialized with the initial address book state, and the currentStatePointer pointing to that single address book state.

Step 2. The user executes delete 5 command to delete the 5th person in the address book. The delete command calls Model#commitAddressBook(), causing the modified state of the address book after the delete 5 command executes to be saved in the addressBookStateList, and the currentStatePointer is shifted to the newly inserted address book state.

Step 3. The user executes add n/David … to add a new person. The add command also calls Model#commitAddressBook(), causing another modified address book state to be saved into the addressBookStateList.

Model#commitAddressBook(), so the address book state will not be saved into the addressBookStateList.
Step 4. The user now decides that adding the person was a mistake, and decides to undo that action by executing the undo command. The undo command will call Model#undoAddressBook(), which will shift the currentStatePointer once to the left, pointing it to the previous address book state, and restores the address book to that state.

currentStatePointer is at index 0, pointing to the initial AddressBook state, then there are no previous AddressBook states to restore. The undo command uses Model#canUndoAddressBook() to check if this is the case. If so, it will return an error to the user rather
than attempting to perform the undo.
The following sequence diagram shows how the undo operation works:

UndoCommand should end at the destroy marker (X) but due to a limitation of PlantUML, the lifeline reaches the end of diagram.
The redo command does the opposite — it calls Model#redoAddressBook(), which shifts the currentStatePointer once to the right, pointing to the previously undone state, and restores the address book to that state.
currentStatePointer is at index addressBookStateList.size() - 1, pointing to the latest address book state, then there are no undone AddressBook states to restore. The redo command uses Model#canRedoAddressBook() to check if this is the case. If so, it will return an error to the user rather than attempting to perform the redo.
Step 5. The user then decides to execute the command list. Commands that do not modify the address book, such as list, will usually not call Model#commitAddressBook(), Model#undoAddressBook() or Model#redoAddressBook(). Thus, the addressBookStateList remains unchanged.

Step 6. The user executes clear, which calls Model#commitAddressBook(). Since the currentStatePointer is not pointing at the end of the addressBookStateList, all address book states after the currentStatePointer will be purged. Reason: It no longer makes sense to redo the add n/David … command. This is the behavior that most modern desktop applications follow.

The following activity diagram summarizes what happens when a user executes a new command:

Design considerations:
Aspect: How undo & redo executes:
-
Alternative 1 (current choice): Saves the entire address book.
- Pros: Easy to implement.
- Cons: May have performance issues in terms of memory usage.
-
Alternative 2: Individual command knows how to undo/redo by
itself.
- Pros: Will use less memory (e.g. for
delete, just save the person being deleted). - Cons: We must ensure that the implementation of each individual command are correct.
- Pros: Will use less memory (e.g. for
Documentation, logging, testing, configuration, dev-ops
Appendix: Requirements
Product scope
Target User
Hackathon team leaders, in charge of distributing tasks to the people in his group
Target user profile:
- has a need to allocate and track tasks to people
- has a need to manage a significant number of people and tasks
- has a need to manage tasks that can change significantly over the course of the project
- prefer using a desktop application for management
- is reasonably comfortable using CLI apps
Value proposition: help with project management tasks and team formation in Hackathons
User stories
Priorities: High (must have) - * * *, Medium (nice to have) - * *, Low (unlikely to have) - *
| Priority | As a … | I want to … | So that I can… | |
|---|---|---|---|---|
* * * |
hackathon team leader | see all tasks | have an overview of what needs to be done | |
* * * |
hackathon team leader | add a task to the task list | include task that needs to be done | |
* * * |
hackathon team leader | delete a task | remove tasks that are accidentally added | |
* * * |
hackathon team leader | edit a task | rectify mistakes in task details | |
* * * |
hackathon team leader | assign a task | allocate task to a person | |
* * * |
hackathon team leader | mark task as done | I can keep a moving record of what we have done | |
* * * |
hackathon team leader | mark task as not done | in case we have tasks that end up being incomplete or the task requirements modified | |
* * |
hackathon team leader | see which tasks are done/ not done | plan the way forward | |
* * |
hackathon team leader | add further descriptions to the task | add more details to a task | |
* * |
hackathon team leader | sort tasks by deadline | know what is most urgent | |
* * |
hackathon team leader | sort tasks by priority | know what is most important | |
* * |
hackathon team leader | filter tasks by different tasks | focus of tasks of a certain type | |
* * |
hackathon team leader | find a specific person | know how much that person has assigned to him |
{More to be added}
Use cases
Use case: Add a new person
MSS
- User requests to add a person
- HackAssist shows a list of fields to input (Name,Phone Number, Email, Address, Tags)
- User inputs fields
- HackAssist shows list of people, including new person
Use case ends.
Extensions
Extensions:
- 3a. HackAssist detects that the person already exists
- 3a1. HackAssist shows an error message
- Use case ends.
- 3b. HackAssist detects that one of the input fields is incorrectly formated
- 3b1. HackAssist shows an error message, showing the incorrectly formated field and the specifications of that field
- Use case ends.
Use case: Delete a team person
MSS
- User requests to delete a new person
- HackAssist shows a list of fields to input (index)
- User inputs fields
- HackAssist displays confirmation message
- HackAssist removes the user’s name and email from all the tasks assigned to that user
- HackAssist shows list of all people, excluding deleted person, and the updated task list
Use case ends.
Extensions
Extensions:
- 3a. HackAssist detects that the index is not a number
- 3a1. HackAssist shows an error message warning that the command format is invalid
- Use case resumes from step 2.
- 3b. HackAssist detects that the index is invalid
- 3b1. HackAssist shows an error message warning that the index is invalid
- Use case resumes from step 2.
Use case: Edit a team person
MSS
- User requests to edit a new person
- HackAssist shows a list of fields to input (index and one or more of Name, Phone Number, Email Address, Tags)
- User inputs fields
- HackAssist displays confirmation message
- HackAssist shows list of all peoples, with that particular person’s fields updated
Use case ends.
Extensions
Extensions:
- 3a. HackAssist detects that the index is not a number
- 3a1. HackAssist shows an error message warning that the command format is invalid
- Use case resumes from step 2.
- 3b. HackAssist detects that the index is invalid
- 3b1. HackAssist shows an error message warning that the index is invalid
- Use case resumes from step 2.
- 3c. HackAssist detects that none of the optional fields were entered
- 3c1. HackAssist shows an error message warning that at least one field must be edited
- Use case resumes from step 2.
- 3d. HackAssist detects that not all the optional fields are different from existing fields
- 3d1. HackAssist shows an error message warning that the fields must be different from the ones inputed
- Use case resumes from step 2.
Use case: Add a task
MSS
- User requests to add a new person
- HackAssist shows a list of fields to input (Name, Description, Priority, Category, Status)
- User inputs fields
- HackAssist shows list of all people, including new person
Use case ends.
Extensions
Extensions:
- 3a. HackAssist detects that the task already exists
- 3a1. HackAssist shows an error message
- Use case ends.
- 3b. HackAssist detects that the deadline has already past
- 3b1. HackAssist shows an error message, warning that the deadline must be a future date
- Use case ends.
- 3c. HackAssist detects that the priority or category is not one of the accepted values
- 3c1. HackAssist shows an error message, showing the incorrect priority or category and showing the correct values
- Use case ends.
- 3d. HackAssist detects that one of the input fields is incorrectly formatted
- 3d1. Hackassist shows an error message, showing the incorrectly formatted field and the specifications of that field
- Use case ends.
Use case: Delete a task
MSS
- User requests to delete a new task
- HackAssist shows a list of fields to input (index)
- User inputs fields
- HackAssist displays confirmation message
- HackAssist removes the task from task list and all people assigned to that task
- HackAssist shows list of all tasks, excluding deleted task, and the updated person list
Use case ends.
Extensions
Extensions:
- 3a. HackAssist detects that the index is not a number
- 3a1. HackAssist shows an error message warning that the command format is invalid
- Use case resumes from step 2.
- 3b. HackAssist detects that the index is invalid
- 3b1. HackAssist shows an error message warning that the index is invalid
- Use case resumes from step 2.
Use case: Assign a task to an existing team person
MSS
- User requests to see all tasks
- HackAssist shows current list of tasks
- User edits the task to have the email of a current person
- User is updated to be assigned to existing task
- Task is updated to show the user assigned to it, and that user’s email
Use case ends.
Extensions
Extensions:
- 2a. There are no tasks
- Use case ends.
- 3a. The format of the input email is invalid
- 3a1 HackAssist shows an error message that shows what is the expected input
- Use case resumes from step 2.
- 3b. There are no people with the specified email
- 3b1 HackAssist shows an error message that there are no people
- Use case resumes from step 2.
Use case: Edit a task
MSS
- User requests to edit a new person
- HackAssist shows a list of fields to input (index and one or more of Name, Description, Priority, Category, Status )
- User inputs fields
- HackAssist displays confirmation message
- HackAssist shows list of all people, with that particular person’s fields updated
Use case ends.
Extensions:
- 3a. HackAssist detects that the index is not a number
- 3a1. HackAssist shows an error message warning that the command format is invalid
- Use case resumes from step 2.
- 3b. HackAssist detects that the index is invalid
- 3b1. HackAssist shows an error message warning that the index is invalid
- Use case resumes from step 2.
- 3c. HackAssist detects that none of optional fields were inputed
- 3c1. HackAssist shows an error message warning that at least one field must be edited
- Use case resumes from step 2.
- 3d. HackAssist detects that the priority or category is not one of the accepted values
- 3d1. HackAssist shows an error message, showing the incorrect priority or category and showing the correct values
- Use case ends.
- 3e. HackAssist detects that not all the optional fields are different from existing fields
- 3e1. HackAssist shows an error message warning that the fields must be different from the ones inputed
- Use case resumes from step 2.
Use case: Filter the tasks by category
MSS
- User requests to filter the tasks by category
- User inputs the category
- HackAssist shows the filtered task list
Use case ends.
Extensions:
- 2a. HackAssist detects that category is not one of the accepted values
- 2a1. HackAssist shows an error message warning that the command format is invalid
- Use case resumes from step 2.
- 2b. HackAssist detects that the command is incorrectly formatted
- 2b1. HackAssist shows an error message warning that command is incorrectly formatted
- Use case resumes from step 2.
Use case: Filter the tasks by deadline
MSS
- User requests to filter the tasks by category
- User inputs the category
- HackAssist shows the filtered task list
Use case ends.
Extensions:
- 2a. HackAssist detects that deadline has already past
- 2a1. HackAssist shows an error message warning that the deadline has past
- Use case resumes from step 2.
- 2b. HackAssist detects that the command is incorrectly formatted
- 2b1. HackAssist shows an error message warning that command is incorrectly formatted
- Use case resumes from step 2.
Use case: Sort the tasks by priority
MSS
- User requests to sort the tasks by priority
- User inputs ascending or descending
- HackAssist shows the sorted task list
Use case ends.
Extensions:
- 2a. HackAssist detects that the command is incorrectly formatted
- 2a1. HackAssist shows an error message warning that command is incorrectly formatted
- Use case resumes from step 2.
Use case: Sort the tasks by deadline
MSS
- User requests to sort the tasks by deadline
- User inputs ascending or descending
- HackAssist shows the sorted task list
Use case ends.
Extensions:
- 2a. HackAssist detects that the command is incorrectly formatted
- 2a1. HackAssist shows an error message warning that command is incorrectly formatted
- Use case resumes from step 2.
Non-Functional Requirements
- Should work on any mainstream OS as long as it has Java
11or above installed. - Should be able to hold up to 1000 persons without a noticeable sluggishness in performance for typical usage.
- A user with above average typing speed for regular English text (i.e. not code, not system admin commands) should be able to accomplish most of the tasks faster using commands than using the mouse.
- Should be usable by hackathon team leaders of all skill levels (i.e. novices to highly experienced).
- Product is not required to handle printing.
- System should respond within two seconds.
- Product is expected to be updated with a new set of features or bugfixes once every two weeks.
- Should be able to read from local disk storage (i.e. persistent storage functionality).
- Product is not designed to work between different disk storages (i.e. only can read and write to local disk storage).
- Should work offline without network connectivity.
- Should only be accessible by Hackathon group leaders.
{More to be added}
Glossary
- Mainstream OS: Windows, Linux, Unix, OS-X
- CLI: Command Line Interface which receives commands from a user in the form of lines of text
Appendix: Instructions for manual testing
Given below are instructions to test the app manually.
Launch and shutdown
-
Initial launch
-
Download the jar file and copy into an empty folder
-
Double-click the jar file Expected: Shows the GUI with a set of sample people. The window size may not be optimum.
-
-
Saving window preferences
-
Resize the window to an optimum size. Move the window to a different location. Close the window.
-
Re-launch the app by double-clicking the jar file.
Expected: The most recent window size and location is retained.
-
-
{ more test cases … }
Deleting a person
-
Deleting a person while all persons are being shown
-
Prerequisites: List all persons using the
listcommand. Multiple persons in the list. -
Test case:
delete 1
Expected: First person is deleted from the list. Details of the deleted person shown in the status message. Timestamp in the status bar is updated. -
Test case:
delete 0
Expected: No person is deleted. Error details shown in the status message. Status bar remains the same. -
Other incorrect delete commands to try:
delete,delete x,...(where x is larger than the list size)
Expected: Similar to previous.
-
-
{ more test cases … }
Saving data
-
Dealing with missing/corrupted data files
- {explain how to simulate a missing/corrupted file, and the expected behavior}
-
{ more test cases … }